Wednesday, April 24, 2013

Comfortable. Cornbread.

Wow. This weather. The past few days are the kind of days that make people want to stay in Seattle forever. Living in Seattle the past 21 years has taught me that these days are definitely worth savoring because it's not always this way. Maybe that's why every time the sun comes out, Seattle-its throw on their shorts and sun dresses like it was the heat of summer. We might be a little impractical, but we sure know how to welcome the sun. I'm also happy to be emerging from the long, gray winter into times with more light, color, and smells. Spring is truly here. 

Yesterday I took advantage of the beauty outside by pulling a chair out front of my house to check emails and chat with my sister and a friend studying abroad while basking in the sun's rays. Then I took a walk to one of my favorite bookstores, Third Place Books, just to browse around. I love this bookstore for many reasons and every time I walk in I feel a sense of community, potential, and inspiration. There's something about having too many books to read and a running list of recommendations that excites me. Even if I will never get around to reading some books I see, I love browsing the diversity of books. There are so many stories in the world worth reading and so much that someone can learn on their own just by reading a book. I like the idea of being a life-long learner, and I think in order to do this you have to keep up a healthy habit of reading. I saw a few new books that I added to my list after yesterday but top of my list is Michael Pollan's new book "Cooked"!

Today I biked to Seward Park from my house, which is a nice ride along Lake Washington. Since it was clear today you could see Mt. Baker all the way down the mountain range to Mt. Rainier. It's crazy how every time I see the mountains on a day like today I am still in awe. They are absolutely stunning. From Seward Park you can see a straight shot to Rainier and even though I know the mountain is many miles away it looks like it is right there because it is so dang huge. I saw in the park and stared at the mountain, feeling it pull me towards its trails. I can't wait to start to go hiking and backpacking more. It's still early in the season, but I can feel the pull already. 

This recipe for vegan cornbread is one I have made many times over the past year. I got the recipe from my boyfriend Lane and it is one of the best cornbread recipes I've ever tasted- vegan or otherwise! We've made this cornbread for lots of events with our friends and what I especially love about it is that it's pretty easy to whip up with ingredients around the house. We've made different variations using yogurt and many times we've even used homemade almond milk (directions for that below). Although the recipe is vegan, Lane loves it with melty butter on top. Jam is also delicious or just eat it hot from the skillet! 


Vegan Cornbread


Ingredients:
2 Tbsp ground flax seed
6 Tbsp water
1 cup all purpose flour
1 cup cornmeal
1/4 cup sugar
4 tsp baking powder
3/4 tsp salt
1 cup soy milk or almond milk- *see below for directions to make homemade!
1/4 cup canola oil

Directions:
1. Preheat oven to 425 degrees
2. Prep an 8 in cast iron skillet with oil (other 8 in pans work too but cast iron is best)
3. Boil water in a small saucepan
4. Add ground flax seed and reduce heat to a simmer until flax and water become gelatinous
5. Set aside
6. In a medium bowl whisk together flour, cornmeal, sugar, baking powder, and salt until well combined
7. Add ground flax, soy milk or almond milk, and canola oil to flax mix
8. Beat until smooth
9. Turn into prepared pan and bake for 20-25 minutes
10. Let cool for 10 min


Homemade Almond Milk

Homemade almond milk is both pleasing to make and to drink. It tastes nothing like the store-bought kind and has the most delightful almond flavor and creaminess. If you buy your almonds in bulk it also can become a cost saver and just one more item to make yourself rather than purchase at the store. If you want to go all out, make some homemade granola to go with your milk!

In a rush, soaking almonds is not necessary but I've discovered that it merely takes more almonds to water to get flavorful milk. 

Ingredients:
Almonds- raw, not roasted
Water

Optional add ins: vanilla, salt, cinnamon, 1 date per bath (for a slight sweetness)

Directions:
1. Soak 1 cup of almonds for at least 8 hours or overnight
2. In a blender, mix soaked almonds with 3 1/2 cups of water until frothy and almonds are completely ground.
3. Add any spices or flavorings. If using a date for sweetness add that now too. 
4. Pour mixture through a thin mesh sieve lined with cheesecloth. As almond meal collects in cheesecloth, squeeze to get all liquid out. 

Lasts about 4 days in the fridge. 

Sunday, April 21, 2013

Great Combinations


Sometimes pairing the simplest foods in great combinations elevates my meal beyond what I first expected. I love starting off brainstorming about recipes by thinking about color, texture, and flavor combinations; fortunately this naturally guides me towards a nutritious meal. As I seek out diversity for my palate, I easily fill my plate with protein, whole grains, or fiber, but more importantly: flavor! And the best part for me is that I'm starting with real, plant-based foods. I feel good. My meal looks appealing. The taste is fantastic. 

Black Bean, Sweet Potato, Kale, and Brie Quesadilla

Ingredients: (Serves 1 hungry or 2 slightly hungry people)
2 tortillas (I like Ezekiel brand)
1 can unsalted black beans (or your own cooked!)
1 medium sweet potato
A handful of kale leaves, my preference is red kale
Your favorite brie cheese (I used Mt. Townsend Creamery)

Directions:
1. Cut up the sweet potato into small chunks 
2. Roast in the oven at 425 with some olive oil until soft
3. Prep quesadillas by placing cheese, black beans, kale and sweet potato between two tortillas
4. Cook in a skillet, preferably a cast iron until warm and crispy


Sunday, November 11, 2012

Homemade Granola. Finally....

Breakfast is a great meal. It's the first opportunity of the day we have to give our bodies energy, love, fuel, and flavor to send us on our way. I have always been a fan of the simple breakfast of yogurt, a piece of cut up seasonal fruit, and a sprinkle of granola on top. Surprisingly though I've never tried to make my own granola... until today! Below is my first successful batch of granola, recipe from the blog Tea and Cookies. I liked this recipe for a few reasons. First, I am ginger obsessed so naturally any recipe with ginger (in any form) attracts my attention. I also liked the low amount of sugar and the variety of nuts and seeds included. I only needed to gather up a few items from the bulk foods section at the grocery store since the pantry at my house tends to be pretty stocked with basic items. One of the joys of living with 7 other people who like to cook!

Cranberry Ginger Granola

Ingredients: 
3 cups old fashioned rolled oats
1/2 cups slivered almonds
1/4 cup chia seeds
1/2 cup raw pumpkin seeds
1/4 cup raw sunflower seeds
1/4 cup flax seeds
1/2 tsp salt
1 tbs vanilla extract
1/4 cup olive oil
1/4 cup honey
1 cup dried cranberries
1/3 cup crystalized ginger


Directions: 

Preheat oven to 325 degrees. Prep a large baking sheet by lining with foil, parchment paper, or greased with butter or oil. 

In one large bowl, combine oats, almonds, chia seeds, pumpkin seeds, sunflower seeds, flax seeds, and salt. In another smaller bowl mix vanilla, olive oil, and honey. 

Ooooo look at how beautiful all those ingredients look together! It's an olive-oil, honey, vanilla art piece! 

Pour liquid ingredients over dry ingredients and mix together well (I used a large whisk).


Spread granola on baking sheet and place in oven. Meanwhile, prep dried fruit by measuring out cranberries and cutting up ginger into small pieces.


Check granola every 10 or so minutes to stir. Granola should be golden brown and finished in 30-45 minutes. 

When done mix in dried fruit as the granola cools. 


Finished! Store in airtight containers, enough to give some of your homemade granola to friends! 
Eat directly from the jar, with rice milk (my favorite, although any milk will do!), or sprinkle over yogurt! 


Saturday, September 29, 2012

Date Cocoa Almond Butter Truffles


Here we are again, Seattle. Birthplace, home, current location. I'm viewing you with new eyes right now. My perspective has changed and I still have to figure out what it means for me, how exactly things have changed. In some ways nothing has changed, except internally my thoughts and discoveries about myself. For the past 6 weeks I was traveling and studying in Thailand, where I was able to get a little time away from my fast paced and sometimes overbooked lifestyle. Thai people are happy beyond all explanation and their approach to daily life is relaxed and to me, makes sense. For awhile I wondered how anything got done in Thailand and was more confused by how things worked, of course experiencing the culture shock that everyone talks about. There is a huge westernization in Thailand, but its fast paced development is also done in a very "Thai" way, keeping the Buddhist and other traditional values. I think this integrity sets the country apart. Thailand isn't trying to be anything it isn't or to fit into a box. As I spent more and more time there, I too felt like I shouldn't try and fit myself into a box or constrain myself from things I want to do. It will be an exploration trying to fit this mentality into my schooling here, in a system that very much stresses conformity, production, and success.  I have started a new major at school here called Comparative History of Ideas, or CHID, that emphasizes making your education work for you instead of merely fulfilling requirements and right now I am in the introductory class where we will figure out our own educational plan and our focus. I'm very excited about this new path I'm on, but a little nervous to figure out how it will actually work in reality. 

When there are a lot of thoughts going on in my brain, creating things actively with my hands helps me to focus on the moment and let things happen as they happen. A few days ago I stumbled across this recipe on one of my favorite blogs, Sprouted Kitchen, so I decided to give it a try. The ingredients are easy to find (although I did have to go to three stores to find unsweetened coconut- they just want to sell you sugar!), and it only uses one piece of equipment: the wonderful food processor. I will definitely be making more of these for gifts and to store in the freezer, but my first batch disappeared within a day. 


(Direct link to recipe here: Almond Date Truffles)

Ingredients:
  • 20 Medjool dates, seeded and halved
  • 1/2 tsp. vanilla extract
  • 1/3 cup creamy almond butter
  • 1/3 cup unsweetened shredded coconut
  • 1/3 cup plus 1 Tbsp. natural cocoa powder
  • 1/2 tsp. sea salt
  • 1 tsp. cinnamon
  • 1/3 cup toasted almonds, well chopped
Directions:
Put the dates and vanilla in a food processor and run until a chunky paste forms. Add the almond butter and pulse a few more times. Add the coconut, cocoa powder, salt and cinnamon and pulse a few more times. The mixture should be a tad crumbly, but press between your fingers and stick together. If it seems too wet to hold in a ball, add more coconut, if too dry, add a touch more almond butter or a spash of water. 
Roll a heaping Tbsp. of the mixture between your palms to form a ball. Repeat with remaining mixture. Put your chopped almonds on a plate and roll each truffle in the almonds (apply a bit of pressure to get them to adhere). Place the plate in the fridge to chill for at least an hour. Truffles will keep covered in the fridge for a couple weeks. 


Thursday, July 5, 2012

Chocolate Beet Cake


Chocolate Beet Cake
Recipe adapted from Joy the Baker


I like to eat cake. I like to look at cakes too and come up with creative ways of making them look festive. In fact, my sister and I each won first place in our Elementary school cake decorating contest 11 consecutive years between the two of us. We do cakes well you could say. One year my sister made a sinking titanic cake that was at a 45 degree angle coming out of the water. Another year I made a life size ballerina cake, tutu and all. And then there was the year that my sister made a train cake with little cars all decorated differently and there was little mishap in the middle of the night. See I got a little hungry and thought I would be able to sneak off a corner of the caboose and smear a little frosting over my bite to cover it up and voila, no one would be able to know. In the morning my sister noticed something funky going on with her cake and freaked out. My mom said we probably had a rat in the house that ate a chunk. The two quickly whipped up a little more cake and frosting and repaired the caboose until it looked normal again. I never confessed it was me who ate a chunk off the end until a few weeks later, and although it was a little hilarious, my sister was pretty angry despite the fact she had won again that year. But hey, I was the little sister and it was my job to be a little rambunctious sometimes! 

After leaving Elementary school, I haven't gotten a chance to make such extravagant cakes but I always welcome another opportunity to be creative. This particular cake I made for last Valentines Day. It is the densest chocolate cake I have ever eaten and also contains my favorite vegetable: Beets!! The frosting is naturally dyed from the beets and you can pretty much say it's healthy (ahem....butter, cream cheese.... obviously don't count). This cake is good for any occasion though and I'm sure I'll make it again soon. 


Ingredients for Cake:
2 medium beets
1 teaspoon vegetable oil
6 ounces (3/4 cup) unsalted butter, softened, plus more for greasing the pans
1 cup packed brown sugar
3/4 cup granulated sugar
1 teaspoon pure vanilla extract
2 cups all-purpose flour, plus more for dusting the pans
2/3 cup unsweetened cocoa powder
1 teaspoon baking soda
1/2 teaspoon baking powder
1 teaspoon salt
1 1/4 cups buttermilk
2 large eggs
Ingredients for Frosting:
8 ounces (1 brick) cream cheese, softened
4 to 5 cups powdered sugar, sifted
2 tablespoons finely grated beets, mashed with a fork
1 teaspoon pure vanilla extract or scrapings of one vanilla bean pod
1-2 teaspoons milk, depending on desired consistency
1/2 teaspoon fresh lemon juice
pinch of salt
1 cup (2 sticks) unsalted butter, softened


Directions:

1) Preheat oven to 350 degrees.
2) Wash and trim beets and roast in a pot of boiling water until tender, about 40 min. The skin of the beets will start to easily peel away.
3) When beets are fully cool, using a Cuisinart or hand-held grater, finely grate beets. 
4) Prep two 9 in baking pans with butter and a circle of parchment paper in the bottom of each pan. 
5) With an electric mixer, cream butter and sugar until fluffy. 
6) One at a time, beat in the eggs. 
7) Next beat in grated beets and vanilla.
8) In another bowl, whisk together flour, baking powder, baking soda, cocoa powder, and salt. 
9) Slowly add half of the dry ingredients to the butter mix. Add half the amount of buttermilk. Add the other half of dry ingredients and the rest of the buttermilk. Mix until fully incorporated but not over-mixed. It is thick batter! (And therefore dense cake!)
10) Scrape batter into the two cake pans and bake 23-25 min until a knife or cake tester comes out clean from the center. 

While cake is baking, make the frosting.

1) With an electric mixer, beat cream cheese until smooth. Add butter and mix until combined. 
2) Add beets, then powdered sugar, vanilla, milk, lemon juice, and salt. Beat until silky. 
3) Place in refrigerator for until cakes are completely cooled. 

To assemble cake merely place one layer of your cake on the surface you will serve it from. Frost the top of this cake. Place the other layer on top. Then completely frost the top and sides of the cake. It will be a gorgeous pink color from the beets! 

Tuesday, July 3, 2012

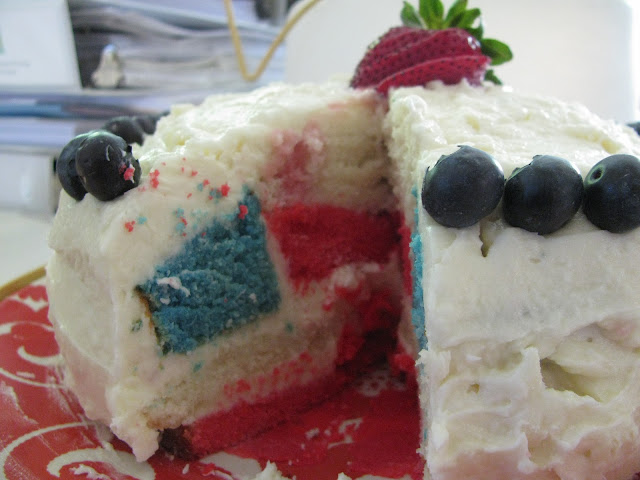
Flag Cake!

Flag Cake! Lemon Cake with White Chocolate Frosting

Well it's raining again..... But I'd use this as an excuse to put on some good music (Florence and the Machine is great baking music), some funky clothes (hawaiian flower print shorts), and bake a cake! A patriotic cake! Just in time for our little holiday known as 4th of July. Then tomorrow, the sun will come out and both the cake and the hawaiian shorts can be put to good use.

I made this cake last year for 4th of July and took it to my neighborhood party. Not only was it delicious but the presentation was a huge hit! It's a pretty dense cake and since there were so many other baked goods at my neighborhood extravaganza last year I had leftovers to pedal on down to Gasworks park with where my friends and I ate even MORE cake and watched the fireworks. It was a good day. 

I will warn you that the assembling of the cake layers is quite a challenge and I would caution anyone who might attempt this cake to read through the directions several times first. (Really.) The best part about this cake is that you'll have leftover cake as you assemble the layers to munch on and make sure everything tastes ok! Rewards for all the hard work. 


Ingredients for 2 layers of cake: **** You must make 1 and 1/2 batches for this cake!!! One layer will be dyed red, one dyed blue, and one left plain. 

2 1/4 cup cake flour
1 tablespoon baking powder
1/2 teaspoon salt
1 1/4 cups whole milk or buttermilk
4 large egg whites
1 1/2 cups sugar
2 teaspoons grated lemon zest
1 stick (8 tablespoons) unsalted butter, room temperature
1/2 teaspoon pure lemon extract

Red food dye
Blue food dye


Directions for cake: 

1. Preheat oven to 350. Prep two 9 inch cake pans. 
2. Mix flour, baking powder, and salt. 
3. Wisk milk and egg whites in a separate bowl.
4. In an electric mixer combine sugar and lemon zest. Add butter and lemon extract. 
5. Add half of flour mix and half of egg mix. Then add the other half of flour mix and egg mix. 
6. Mix until all ingredients are fully incorporated. 
7. Pour into pie pans and bake 30 min. 

Ingredients for frosting: *** Double the recipe to make sure you have a good thick layer of frosting! And from these photos you can see I spread it nice and thick. 

5 ounces good quality white chocolate, chopped fine
2 sticks (1 cup) unsalted butter, room temperature
3 cups powdered sugar, sifted
pinch salt
1/2 teaspoon vanilla extract
1/4 cup sour cream


Directions for frosting:

1. Melt white chocolate in microwave by heating in small 30 second intervals. Set aside to cool. 
2. In a mixer beat butter then add powdered sugar until combined fully. 
3. Add salt, vanilla, and sour cream.
4. Add white chocolate and mix until done! 


How to Assemble:

1. Cut red and white cakes horizontally so you have two layers of each.
2. Place one layer of red on your surface topped by one layer of white with a layer of frosting in between. 
3. Stack the remaining red and white layers with blue on top on a separate work area. (no frosting)
4. Place a small bowl in the center of the stack of red, white, and blue, and carefully cut out a circle through all 3 layers. 
5. Set the red and white outer parts and the blue circle aside to be munched on.
6. Stack the red circle topped by the white circle on top of your bottom layers with frosting in between.
7. Finally put the blue outer portion around the red/white circles with frosting. 
8. Finish frosting the entire outside and top of cake.
9. Decorate with fresh blueberries and strawberries if desired. 
10. You're finished! Cut a slice for presentation. 


Sunday, July 1, 2012

Curried Squash and Red Lentils


I've revamped my blog and would like to share my cooking with you all in a more accessible way by posting recipes included with my photos. Part of why I like to cook and share meals with friends, family, and even strangers is because we can all be united by eating the same foods together. I want to share the things I create in my life with others in order to create a universal love for good, healthy, and conscious eating. This kind of eating is nothing fancy. It doesn't require spending large sums of money at hip grocery stores. It doesn't mean slaving over a hot stove for hours on end and following a complicated recipe to a tee. Rather it is a quiet kind of revolution, one that honors simple living. It might mean digging through some dirt in your back garden or chatting with a farmer at the local farmer's market. But in my opinion, these are all keys to the good life. 

Curried Squash and Red Lentils 
Adapted from Shutterbean


This dish is one I have made many times over the past couple of months after finding it on one of my favorite blogs of all time, Shutterbean. I like the idea of a one bowl meal and the flavors in this dish make me feel warm and satisfied. It also can be varied depending on the vegetables you have in your fridge, one of those "kitchen sink" type dishes that you can pretty much hide whatever you like within the lentil goodness. 


Ingredients: Serves 4. 
I halved the ingredients to make enough for dinner and a leftover lunch but kept the quantity of carrot and celery the same because I'm a veggie fan. I also added zucchini, you know, just because. 

3 tablespoons olive oil
2 tablespoons butter or margarine
1 1/2 lb butternut squash, peeled & cut into 1/2 inch pieces
1 large onion, chopped
1 carrot, chopped
1 celery stalk, chopped
2 cloves garlic, finely chopped
2 tablespoons grated ginger
1 teaspoon kosher salt
1/4 teaspoon black pepper
1 tablespoon curry powder
1 cup red lentils
4 cups water
1 teaspoon fresh lemon juice


Directions:
Melt butter and olive oil in a large pan. Add squash, onion, garlic, carrot, celery, ginger, and salt. Cook until onion is done. Add spices along with lentils and water. Cook covered, stirring periodically and checking to see if more water is needed until lentils are fully cooked. Add lemon juice and garnish with fresh cilantro.